Saturday, August 26, 2017

The Mosaic Dome Die & My Eid Cards

Hello everyone!
Remember my last post on Eid Greetings Cards? After having success on selling those cards on my Etsy shop, I decided to create some more for Eid-al-adha.. I was a little busy with my DT projects & household chores & had a lot of trials & errors.. So, I am too late to sell cards this time! But, still ended up creating 8 pairs of cards.. 


My cards are of 2 types.. Some are made with watercolor backgrounds.. & some with a beautiful dome diecut!


This pair of cards are made with the a beautiful Mosaic Dome die set by Altenew.. I just cut some Shimmering Cardstocks (the colors are sooo beautiful! you'll love it!) from the Crafter's Companion & stamped Eid Mubarak from the Eid Greetings Stamp set by altenew.. 


These are also created with the same die.. The only difference is, on the green-red cards I die cut the dome on the card front & inserted the other diecut piece.. But, here I just topped the golden dome on the card front.. Easy, right? For the dome, I used golden Luxury Cardstock from the Crafter's Companion (check these out! there are soooo many amazing colors!!!) 


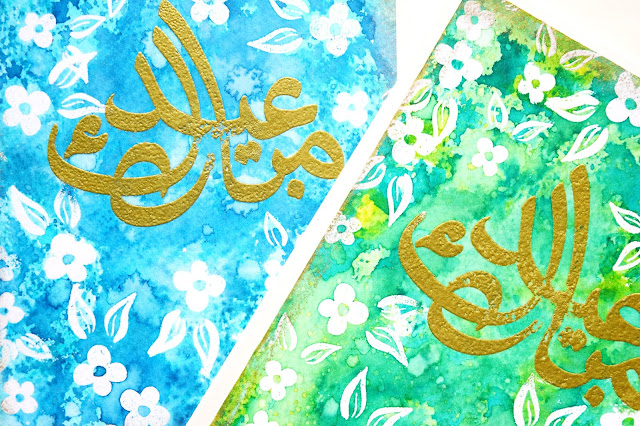
This pair is created using the watercolor resist technique.. I used Ranger gold embossing powder & Clear embossing powder for embossing the stamp image & to create the resist.. Then I used the smooching technique with watercolors.
Oh, I forgot to mention! Currently I am in love with watercoloring! I wish I could watercolor everyday, all day long! I have been introduced to watercolor recently for my DT projects & oh my! I loved it! I used Spectrum Noir Aqua Markers for watercoloring.. & also Aqua Watercolour cardstock... 


Here is my another watercolor card.. I created a background with the watercolor markers & then added 2 diecut doilies with golden sentiments.. The doilies are made with the Verity Rose Doily metal die (get it if you like it! these are on clearance sale, & once these are gone, are gone forever! ).. Loved the resulted look!

Hope you liked my cards.. I am really enjoying the papaercrafting! But, still I miss mixed media! I hope my next post will be on a mixed media project! InshAllah..

That's all for today.. Let me know if you liked my work..
Thank you

Tavana

Friday, August 18, 2017

ITAC 2017 Challenge 1, EUROPE: The Face of Printmaking

Hi everyone! I'm back with a mixed media canvas.. After a long period of papercrafting, I was craving for a treat! & treat means, MIXED MEDIA!!!  


I have worked all by myself for a long time! So, this time I decided to go for a challenge! & for that, I am taking part on a tournament! AALL & Create is organizing an international 6 week long tournament, ITAC'17 where there will be 6 challenges in total & also a loooot of experienced & amazing artist judges! I know, I'm new & am not very experienced yet! But, I still decided to take part as a challenge to myself! I want to see how far can I go when it comes to a selected theme! And also there is a lot to learn! :)


The first challenge is EUROPE- The Face of Printmaking. The theme & some suggestions have been given on the website & also some works from the judges.. I loved their work! & it was time for me to create!  

I was really confused what to do first! What if I miss some suggestions! What if my work is not good enough! Then I decided to go with a flow as always.. I kept the suggestions in my mind & started working.. 

I pasted some torn pages of an old oxford dictionary on the whole canvas panel with modpodge.. Then, lightly gessoed all over.. 
 
Then I glued a crochet lace on a side & also added some glass beads..Then I gessoed all over again & then added colors.. My primary plan was to add blue, some shade of brown & keep some area white where the dictionary print can be seen... So, I splattered some water on the paint (while it was still drying) & after a minute I pressed a paper towel to remove the water & paint.. This created a bleached out look like watercolors.. But, later I decided to add more patterns & all... 
 
On their suggestion, there was a point to add blue on the project as this is the color of the european union flag! So, I decided to add some yellow stars too! It added more texture & a splash of brightness on the canvas.. I pasted a corrugated cardboard (cut from an old box) & a strip of fabric underneath.. For the focal point I could add a face, as it was also a point from the suggestions.. But, as I don't do faces, I didn't have anything to make it & also I thought of adding something else.. So, I created a nest with jute strings & put flowers over it. Then I added the sentiments..

As the challenge is related with printmaking, I added some scribbles with black & white pens. Some splashes of gesso, & all other colors that ave been used here & some thumbprints with red! & lastly, I added some touches of gilding wax! 


Though I wanted it to keep clean & simple, it ended up very busy! But, I loved the final look.. Especially, when I see the details I added & the thoughts I had while going through the process, I feel happy! & I create to be happy! Don't you?

Hope you all liked my work.. Please leave me comments about your thoughts on my work.. Thank you!

Tavana


Friday, August 11, 2017

Sheena Douglass Winter Scenic Collection

Hello Everyone! Today I'm going to write about some amazing stamp & dies sets by Sheen Douglass. These sets are from Crafter's Companion coming on HSN on August 16, 2017.

These are called Winter Scenic Collections & there are 4 sets in total.. I have made cards with 3 of these..


This Set is called the "Christmas Deer" set. I have used Crafter's Companion prescored card blanks, which is a diorama card. I made 3 layers here.. The background is stamped & then colored. For stamping, I have used the stamp from the set, For the middle part, I have diecut the tree (the die is in the set) & then diecut the front part on the cardfront. There is also a stamp in the set for the deer & the sentiment. I sketched a little with the Spectrum Noir Artliner pens to match the tree trunk with the view.. Isn't that easy?!


This set is called the "Snow Drop" set. I tried to keep this one as simple as possible! I used a prescored "Square Center Step" card. stamped a square white cardstock with the stamp colored it, diecut the flowers & stamped & stick it just over the flower image to create a dimension.. & embossed the sentiment with black embossing powder. Then cut the cardfront & stick the stamped image behind it with hot glue (so that it has a little dimension).. and then I colored it.. For the stepped sides, I diecut with a die from another collection.. I've again used the artliner pens to sketch the parts which do not have stamped images..


This set is called the "Snowman set".. Like the  other sets, this has a stamp for background , a die for the cardfront & another die to match the stamp.. But, in this set, the cardfront has a bird on it (there is also a stamp for the bird). & the bird sits just over the image of the snowman! So, I diecut & stamped the snowman separately & added on the stepped part.. Also I have sketched the leaves that are not stamped.. The prescored card base I have used here is called the "Squared Side Step" Card.

Here was my handmade cards.. There are more amazing cards made by other DT members.. To know more & see more don't forget to check Crafter's Companion Pinterest BoardsInstagram & Facebook page. If you are on facebook, join our watch party to updated all the time! And if you want to know the timing of the show visit this page

Thank you!
Tavana <3